Maximize Your Coconut: Crafting Homemade Bowls, Shreds, and Chips
The humble coconut, a staple in tropical regions worldwide, is far more than just a source of refreshing water and delicious meat. It's a powerhouse of versatility, offering an incredible array of ingredients and even craft materials from a single fruit. Imagine transforming a discarded coconut shell into a beautiful, food-safe bowl or turning fresh coconut meat into healthy, homemade snacks. This article will guide you through the rewarding journey of maximizing every part of your coconut, empowering you to create your own stunning
coconut shreds chips bowls right in your kitchen. Embrace sustainability, creativity, and the joy of DIY with these simple, cost-effective projects.
The Humble Coconut: A Treasure Trove of DIY Potential
Coconuts are truly one of nature's most impressive offerings. Beyond their culinary delights, they present a fantastic opportunity for sustainable living and creative crafting. When you buy a coconut for its water or meat, the shell often goes to waste. However, with a little effort and a few basic tools, you can transform this "waste" into practical and beautiful items for your home. This approach not only reduces your carbon footprint but also allows you to enjoy natural, chemical-free products. From the refreshing coconut water to the nutritious meat and the sturdy shell, every part has value waiting to be unlocked. Let's delve into how you can harness this potential.
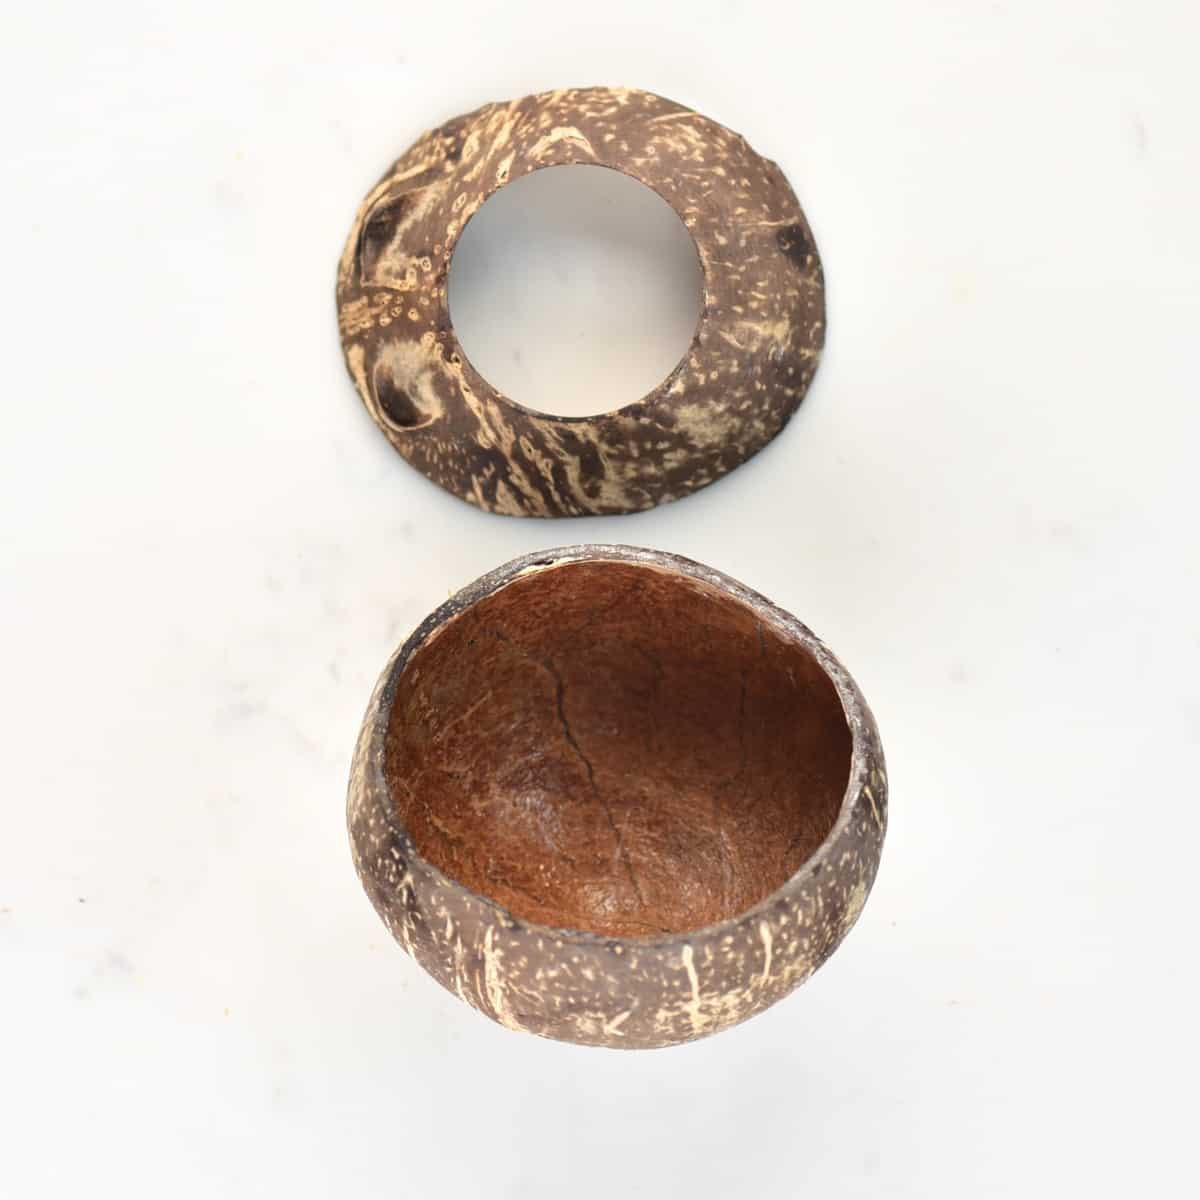
Crafting Your Own Eco-Friendly Coconut Bowls
Creating your own coconut bowls is a satisfying project that yields beautiful, functional, and eco-friendly results. Whether you envision them for vibrant smoothie bowls, decorative storage, or unique gifts, the process is surprisingly simple.
Why Make Your Own Coconut Bowls?
The appeal of homemade coconut bowls lies in their unique blend of aesthetics, sustainability, and practicality. When you make them yourself, you're not just saving money; you're also ensuring that your bowls are 100% natural, free from BPA, plastics, synthetic materials, and other toxins often found in manufactured products. They make for truly impressive and thoughtful gifts, showcasing your handmade touch. For an even deeper dive into this specific craft, check out our guide on
DIY Coconut Bowls: Craft Eco-Friendly Bowls Cheaper Than Buying.
Essential Tools and Materials for Bowl Making
To embark on your bowl-making adventure, you'll need:
- Mature Coconuts: Look for coconuts with slightly flatter ends for better stability and a nice round shape. Avoid those with excessive outer fibrous husk, as they'll require more cleaning.
- Small Handsaw: While other methods exist for opening coconuts, a small handsaw (available affordably at hardware stores) ensures a clean, even cut – crucial for balanced bowls.
- Sandpaper: A selection of grits, typically coarse (e.g., 60-80 grit), medium (e.g., 120-150 grit), and fine (e.g., 220+ grit) for a smooth finish.
- Brush: For cleaning away dust during sanding.
- Food-Safe Finishing Oil: For bowls intended for food, opt for natural oils like linseed oil, walnut oil, extra virgin coconut oil, or a mixture of food-grade mineral oil with beeswax. These penetrate and protect the wood while remaining safe for consumption. For purely decorative bowls, any standard wood lacquer will suffice.
- Kitchen Towel or Soft Surface: To prevent the coconut from rolling while cutting.
Step-by-Step Guide to Beautiful Coconut Bowls
1.
Open the Coconut Precisely: The key to a good bowl is a clean, even cut. Place the coconut on a kitchen towel or soft surface to stabilize it. Hold one end firmly (away from the saw) and begin slowly sawing back and forth around the middle of the coconut. Once you've sawn about an inch or two deep, turn the coconut over and gently pull apart the cut to drain the refreshing coconut water into a bowl (don't discard it – it's delicious!). Continue sawing until the coconut is completely separated into two halves.
2.
Remove the Coconut Meat: Carefully scoop out the coconut meat from both halves. A sturdy spoon or butter knife can help loosen it from the shell. Don't worry if it's not perfectly clean at this stage; we'll refine it later.
3.
Clean and Sand the Shells:
- First, use a coarse grit sandpaper to remove any remaining fibrous husk or rough edges on both the exterior and interior of the shell. Pay attention to the cut edge to make it smooth and level.
- Progress to medium grit sandpaper to further smooth the surfaces, eliminating deeper scratches from the coarse grit.
- Finally, use fine grit sandpaper for a silky-smooth finish. This step is essential for a pleasant tactile experience and a professional look.
- Once sanded, wipe down the bowls thoroughly with a damp cloth to remove all dust, then let them air dry completely.
4.
Apply Food-Safe Finish:
- For bowls that will hold food, generously apply your chosen food-safe oil (e.g., coconut oil, linseed oil) with a clean cloth, both inside and out. Allow the oil to soak in for several hours, or even overnight.
- Wipe off any excess oil with a clean cloth. You may repeat this process 2-3 times over a few days for maximum protection and a beautiful sheen. For bowls that will be washed frequently, the mineral oil and beeswax mixture offers superior waterproofing and durability.
- Allow the bowls to cure fully according to your chosen oil's instructions before first use.
From Fresh Meat to Delicious Coconut Shreds and Crispy Chips
Once you've scooped out the fresh coconut meat from your bowl-making endeavor, the possibilities don't end there! You can easily transform this raw ingredient into versatile and delicious
homemade coconut shreds and crispy
coconut chips.
The Joy of Homemade Shredded Coconut
Homemade shredded coconut is a revelation compared to its store-bought counterpart. It's fresher, free from preservatives and added sugars, and you can customize the texture to your liking. It's perfect for baking, garnishing desserts, adding to granola, or even as a base for homemade coconut milk. For a more detailed guide on creating these delicious treats, check out our companion article:
Homemade Coconut Shreds & Chips: Easy Oven & Dehydrator Guide.
Crafting Perfect Coconut Chips
Coconut chips are an incredibly addictive and healthy snack. Thinly sliced and then dried or baked, they offer a satisfying crunch and a natural sweetness. You can enjoy them plain, lightly salted, or seasoned with various spices for a sweet or savory treat. They make excellent garnishes for smoothie bowls, yogurts, and even Asian-inspired dishes.
Tools and Techniques for Shreds and Chips
1.
Prepare the Coconut Meat: After opening your coconut (if not already done for bowls), you'll need to separate the hard outer shell from the meat. A hammer or cleaver can help with this. Then, using a vegetable peeler, carefully remove the thin, brown skin (testa) from the white coconut meat. This step is optional but results in a cleaner appearance and milder flavor.
2.
Grate for Shreds:
- For fine shreds, use the smallest holes on your box grater. This texture is ideal for baking where you want the coconut to blend in.
- For typical shredded coconut, use the larger holes on your grater. This is perfect for toppings, granola, or general baking.
3.
Slice for Chips:
- To make uniform coconut chips, use the slicing blade on your box grater, a mandoline slicer, or even a sharp vegetable peeler. Aim for thin, even slices to ensure consistent crispiness. The thinner the slice, the crispier the chip will be.
4.
Dry or Bake Your Creations:
- Oven Method: Spread the shredded coconut or chips in a single layer on a baking sheet lined with parchment paper. Bake in a preheated oven at a low temperature, typically between 250-300°F (120-150°C), for 20-30 minutes. Stir frequently every 5-7 minutes to ensure even toasting and prevent burning. Watch closely, as coconut can go from perfectly golden to burnt very quickly.
- Dehydrator Method: For a raw food-friendly option and often a more even dry, spread the coconut evenly on dehydrator trays. Dehydrate at a lower temperature, around 115-125°F (46-52°C), for several hours (4-8+ hours), checking periodically until crisp.
- Convection Oven: A convection oven can speed up the drying process due to its fan-assisted heat distribution, often requiring slightly lower temperatures and shorter times than conventional ovens.
5.
Flavoring Your Chips: Once cool, your chips can be enjoyed plain, or you can add flavorings. A sprinkle of sea salt enhances the natural sweetness. For a sweet treat, toss them lightly with a touch of maple syrup or a dash of cinnamon before baking. For savory chips, experiment with a pinch of chili powder, smoked paprika, or a hint of garlic powder.
Maximizing Your Coconut: Tips and Beyond
Beyond the bowls, shreds, and chips, there's even more to love about your coconut:
*
Don't Waste a Drop of Coconut Water: The liquid drained from your fresh coconut is a natural electrolyte drink, perfect on its own or added to smoothies. It's packed with potassium and other beneficial minerals.
*
Coconut Meat Versatility: Fresh coconut meat isn't just for shreds and chips. Blend it with water to make fresh coconut milk or cream, add chunks to curries, or incorporate it into fruit salads.
*
Storage Tips: Store your homemade shredded coconut and chips in airtight containers at room temperature for up to 1-2 weeks, or in the refrigerator for longer freshness. You can also freeze shredded coconut for extended storage.
*
Creative Uses for Bowls: Your beautiful coconut bowls aren't limited to just food. Use them as unique holders for keys, jewelry, or small office supplies. They also make charming decorative pieces or mini planters for succulents.
Conclusion
Embracing the full potential of a single coconut is a rewarding journey into sustainable living, creativity, and delicious homemade goodness. From crafting unique, eco-friendly
coconut bowls to preparing your own fresh
coconut shreds and crispy
coconut chips, you're not just making things; you're reducing waste, saving money, and enjoying natural, wholesome products. So next time you grab a coconut, remember that its possibilities extend far beyond its refreshing water. Dive into these DIY projects and discover the incredible versatility and value packed within this tropical treasure!